uwsgi; oh my!

The world of Python based web applications, WSGI, its interaction with uwsgi and various deployment methods can quickly turn into a incredible array of confusingly named acronym soup. If you jump straight into the uwsgi documentation it is almost certain you will get lost before you start!

Below tries to lay out a primer for the foundations of application deployment within devstack; a tool for creating a self-contained OpenStack environment for testing and interactive development. However, it is hopefully of more general interest for those new to some of these concepts too.

WSGI

Let's start with WSGI. Fully described in PEP 333 -- Python Web Server Gateway Interface the core concept a standardised way for a Python program to be called in response to a web request. In essence, it bundles the parameters from the incoming request into known objects, and gives you can object to put data into that will get back to the requesting client. The "simplest application", taken from the PEP directly below, highlights this perfectly:

def simple_app(environ, start_response):
     """Simplest possible application object"""
     status = '200 OK'
     response_headers = [('Content-type', 'text/plain')]
     start_response(status, response_headers)
     return ['Hello world!\n']

You can start building frameworks on top of this, but yet maintain broad interoperability as you build your application. There is plenty more to it, but that's all you need to follow for now.

Using WSGI

Your WSGI based application needs to get a request from somewhere. We'll refer to the diagram below for discussions of how WSGI based applications can be deployed.

Overview of some WSGI deployment methods

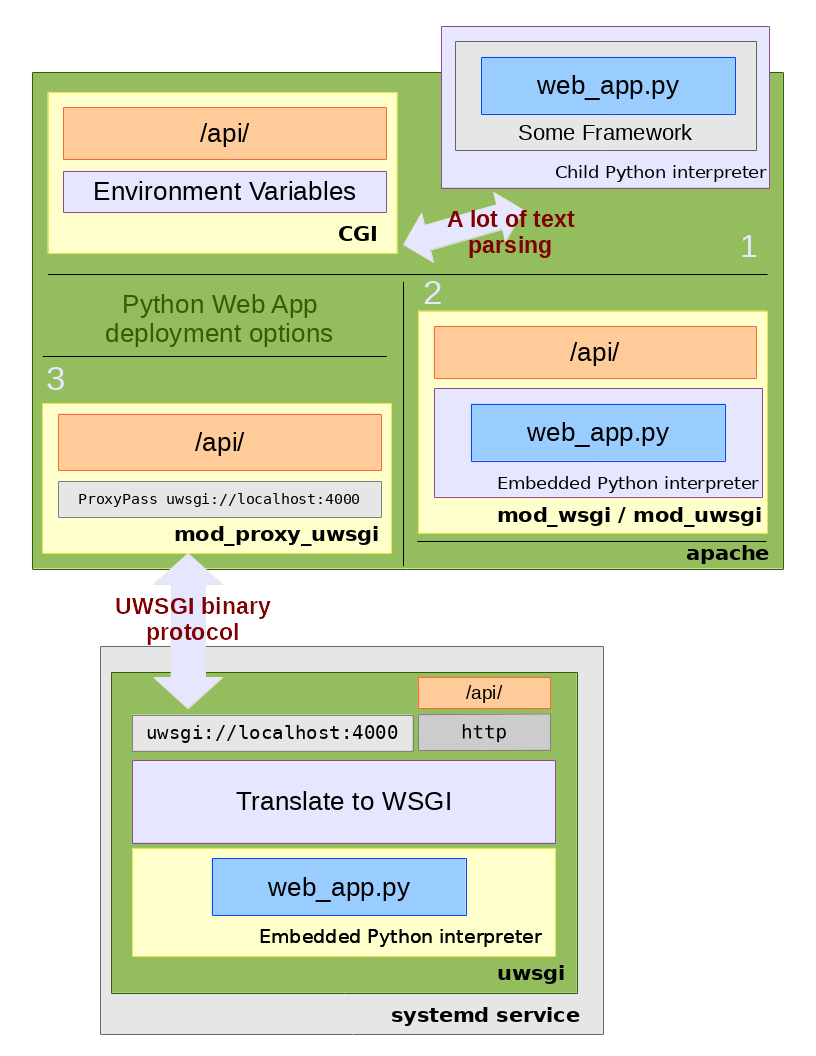
In general, this is illustrating how an API end-point http://service.com/api/ might be connected together to an underlying WSGI implementation written in Python (web_app.py). Of course, there are going to be layers and frameworks and libraries and heavens knows what else in any real deployment. We're just concentrating on Apache integration -- the client request hits Apache first and then gets handled as described below.

CGI

Starting with 1 in the diagram above, we see CGI or "Common Gateway Interface". This is the oldest and most generic method of a web server calling an external application in response to an incoming request. The details of the request are put into environment variables and whatever process is configured to respond to that URL is fork() -ed. In essence, whatever comes back from stdout is sent back to the client and then the process is killed. The next request comes in and it starts all over again.

This can certainly be done with WSGI; above we illustrate that you'd have a framework layer that would translate the environment variables into the python environ object and connect up the processes output to gather the response.

The advantage of CGI is that it is the lowest common denominator of "call this when a request comes in". It works with anything you can exec, from shell scripts to compiled binaries. However, forking processes is expensive, and parsing the environment variables involves a lot of fiddly string processing. These become issues as you scale.

Modules

Illustrated by 2 above, it is possible to embed a Python interpreter directly into the web server and call the application from there. This is broadly how mod_python, mod_wsgi and mod_uwsgi all work.

The overheads of marshaling arguments into strings via environment variables, then unmarshaling them back to Python objects can be removed in this model. The web server handles the tricky parts of communicating with the remote client, and the module "just" needs to translate the internal structures of the request and response into the Python WSGI representation. The web server can manage the response handlers directly leading to further opportunities for performance optimisations (more persistent state, etc.).

The problem with this model is that your web server becomes part of your application. This may sound a bit silly -- of course if the web server doesn't take client requests nothing works. However, there are several situations where (as usual in computer science) a layer of abstraction can be of benefit. Being part of the web server means you have to write to its APIs and, in general, its view of the world. For example, mod_uwsgi documentation says

"This is the original module. It is solid, but incredibly ugly and does not follow a lot of apache coding convention style".

uwsgi

mod_python is deprecated with mod_wsgi as the replacement. These are obviously tied very closely to internal Apache concepts.

In production environments, you need things like load-balancing, high-availability and caching that all need to integrate into this model. Thus you will have to additionally ensure these various layers all integrate directly with your web server.

Since your application is the web server, any time you make small changes you essentially need to manage the whole web server; often with a complete restart. Devstack is a great example of this; where you have 5-6 different WSGI-based services running to simulate your OpenStack environment (compute service, network service, image service, block storage, etc) but you are only working on one component which you wish to iterate quickly on. Stopping everything to update one component can be tricky in both production and development.

uwsgi

Which brings us to uwsgi (I call this "micro-wsgi" but I don't know if it actually intended to be a μ). uwsgi is a real Swiss Army knife, and can be used in contexts that don't have to do with Python or WSGI -- which I believe is why you can get quite confused if you just start looking at it in isolation.

uwsgi lets us combine some of the advantages of being part of the web server with the advantages of abstraction. uwsgi is a complete pluggable network daemon framework, but we'll just discuss it in one context illustrated by 3.

In this model, the WSGI application runs separately to the webserver within the embedded python interpreter provided by the uwsgi daemon. uwsgi is, in parts, a web-server -- as illustrated it can talk HTTP directly if you want it to, which can be exposed directly or via a traditional proxy.

By using the proxy extension mod_proxy_uwsgi we can have the advantage of being "inside" Apache and forwarding the requests via a lightweight binary channel to the application back end. In this model, uwsgi provides a uwsgi:// service using its internal protcol on a private port. The proxy module marshals the request into small packets and forwards it to the given port. uswgi takes the incoming request, quickly unmarshals it and feeds it into the WSGI application running inside. Data is sent back via similarly fast channels as the response (note you can equally use file based Unix sockets for local only communication).

Now your application has a level of abstraction to your front end. At one extreme, you could swap out Apache for some other web server completely and feed in requests just the same. Or you can have Apache start to load-balance out requests to different backend handlers transparently.

The model works very well for multiple applications living in the same name-space. For example, in the Devstack context, it's easy with mod_proxy to have Apache doing URL matching and separate out each incoming request to its appropriate back end service; e.g.

  • http://service/identity gets routed to Keystone running at localhost:40000
  • http://service/compute gets sent to Nova at localhost:40001
  • http://service/image gets sent to glance at localhost:40002

and so on (you can see how this is exactly configured in lib/apache:write_uwsgi_config).

When a developer makes a change they simply need to restart one particular uwsgi instance with their change and the unified front-end remains untouched. In Devstack (as illustrated) the uwsgi processes are further wrapped into systemd services which facilitates easy life-cycle and log management. Of course you can imagine you start getting containers involved, then container orchestrators, then clouds-on-clouds ...

Conclusion

There's no right or wrong way to deploy complex web applications. But using an Apache front end, proxying requests via fast channels to isolated uwsgi processes running individual WSGI-based applications can provide both good performance and implementation flexibility.

Zuul and Ansible in OpenStack CI

In a prior post, I gave an overview of the OpenStack CI system and how jobs were started. In that I said

(It is a gross oversimplification, but for the purposes of OpenStack CI, Jenkins is pretty much used as a glorified ssh/scp wrapper. Zuul Version 3, under development, is working to remove the need for Jenkins to be involved at all).

Well some recent security issues with Jenkins and other changes has led to a roll-out of what is being called Zuul 2.5, which has indeed removed Jenkins and makes extensive use of Ansible as the basis for running CI tests in OpenStack. Since I already had the diagram, it seems worth updating it for the new reality.

OpenStack CI Overview

While previous post was really focused on the image-building components of the OpenStack CI system, overview is the same but more focused on the launchers that run the tests.

Overview of OpenStack CI with Zuul and Ansible
  1. The process starts when a developer uploads their code to gerrit via the git-review tool. There is no further action required on their behalf and the developer simply waits for results of their jobs.

  2. Gerrit provides a JSON-encoded "fire-hose" output of everything happening to it. New reviews, votes, updates and more all get sent out over this pipe. Zuul is the overall scheduler that subscribes itself to this information and is responsible for managing the CI jobs appropriate for each change.

  3. Zuul has a configuration that tells it what jobs to run for what projects. Zuul can do lots of interesting things, but for the purposes of this discussion we just consider that it puts the jobs it wants run into gearman for a launcher to consume. gearman is a job-server; as they explain it "[gearman] provides a generic application framework to farm out work to other machines or processes that are better suited to do the work". Zuul puts into gearman basically a tuple (job-name, node-type) for each job it wants run, specifying the unique job name to run and what type of node it should be run on.

  4. A group of Zuul launchers are subscribed to gearman as workers. It is these Zuul launchers that will consume the job requests from the queue and actually get the tests running. However, a launcher needs two things to be able to run a job — a job definition (what to actually do) and a worker node (somewhere to do it).

    The first part — what to do — is provided by job-definitions stored in external YAML files. The Zuul launcher knows how to process these files (with some help from Jenkins Job Builder, which despite the name is not outputting XML files for Jenkins to consume, but is being used to help parse templates and macros within the generically defined job definitions). Each Zuul launcher gets these definitions pushed to it constantly by Puppet, thus each launcher knows about all the jobs it can run automatically. Of course Zuul also knows about these same job definitions; this is the job-name part of the tuple we said it put into gearman.

    The second part — somewhere to run the test — takes some more explaining. To the next point...

  5. Several cloud companies donate capacity in their clouds for OpenStack to run CI tests. Overall, this capacity is managed by a customized management tool called nodepool (you can see the details of this capacity at any given time by checking the nodepool configuration). Nodepool watches the gearman queue and sees what requests are coming out of Zuul. It looks at node-type of jobs in the queue (i.e. what platform the job has requested to run on) and decides what types of nodes need to start and which cloud providers have capacity to satisfy demand.

    Nodepool will start fresh virtual machines (from images built daily as described in the prior post), monitor their start-up and, when they're ready, put a new "assignment job" back into gearman with the details of the fresh node. One of the active Zuul launchers will pick up this assignment job and register the new node to itself.

  6. At this point, the Zuul launcher has what it needs to actually get jobs started. With an fresh node registered to it and waiting for something to do, the Zuul launcher can advertise its ability to consume one of the waiting jobs from the gearman queue. For example, if a ubuntu-trusty node is provided to the Zuul launcher, the launcher can now consume from gearman any job it knows about that is intended to run on an ubuntu-trusty node type. If you're looking at the launcher code this is driven by the NodeWorker class — you can see this being created in response to an assignment via LaunchServer.assignNode.

    To actually run the job — where the "job hits the metal" as it were — the Zuul launcher will dynamically construct an Ansible playbook to run. This playbook is a concatenation of common setup and teardown operations along with the actual test scripts the jobs wants to run. Using Ansible to run the job means all the flexibility an orchestration tool provides is now available to the launcher. For example, there is a custom console streamer library that allows us to live-stream the console output for the job over a plain TCP connection, and there is the possibility to use projects like ARA for visualisation of CI runs. In the future, Ansible will allow for better coordination when running multiple-node testing jobs — after all, this is what orchestration tools such as Ansible are made for! While the Ansible run can be fairly heavyweight (especially when you're talking about launching thousands of jobs an hour), the system scales horizontally with more launchers able to consume more work easily.

    When checking your job results on logs.openstack.org you will see a _zuul_ansible directory now which contains copies of the inventory, playbooks and other related files that the launcher used to do the test run.

  7. Eventually, the test will finish. The Zuul launcher will put the result back into gearman, which Zuul will consume (log copying is interesting but a topic for another day). The testing node will be released back to nodepool, which destroys it and starts all over again — nodes are not reused and also have no sensitive details on them, as they are essentially publicly accessible. Zuul will wait for the results of all jobs for the change and post the result back to Gerrit; it either gives a positive vote or the dreaded negative vote if required jobs failed (it also handles merges to git, but that is also a topic for another day).

Work will continue within OpenStack Infrastructure to further enhance Zuul; including better support for multi-node jobs and "in-project" job definitions (similar to the https://travis-ci.org/ model); for full details see the spec.

Image building in OpenStack CI

Also titled minimal images - maximal effort!

The OpenStack Infrastructure Team manages a large continuous-integration system that provides the broad range of testing the OpenStack project requires. Tests are run thousands of times a day across every project, on multiple platforms and on multiple cloud-providers. There are essentially no manual steps in any part of the process, with every component being automated via scripting, a few home-grown tools and liberal doses of Puppet and Ansible. More importantly, every component resides in the public git trees right alongside every other OpenStack project, with contributions actively encouraged.

As with any large system, technical debt can build up and start to affect stability and long-term maintainability. OpenStack Infrastructure can see some of this debt accumulating as more testing environments across more cloud-providers are being added to support ever-growing testing demands. Thus a strong focus of recent work has been consolidating testing platforms to be smaller, better defined and more maintainable. This post illustrates some of the background to the issues and describes how these new platforms are more reliable and maintainable.

OpenStack CI Overview

Before getting into details, it's a good idea to get a basic big-picture conceptual model of how OpenStack CI testing works. If you look at the following diagram and follow the numbers with the explanation below, hopefully you'll have all the context you need.

Overview of OpenStack CI
  1. The developer uploads their code to gerrit via the git-review tool. There is no further action required on their behalf and the developer simply waits for results.

  2. Gerrit provides a JSON-encoded "firehose" output of everything happening to it. New reviews, votes, updates and more all get sent out over this pipe. Zuul is the overall scheduler that subscribes itself to this information and is responsible for managing the CI jobs appropriate for each change.

  3. Zuul has a configuration that tells it what jobs to run for what projects. Zuul can do lots of interesting things, but for the purposes of this discussion we just consider that it puts the jobs it wants run into gearman for a Jenkins master to consume. gearman is a job-server; as they explain it "[gearman] provides a generic application framework to farm out work to other machines or processes that are better suited to do the work". Zuul puts into gearman basically a tuple (job-name, node-type) for each job it wants run, specifying the unique job name to run and what type of node it should be run on.

  4. A group of Jenkins masters are subscribed to gearman as workers. It is these Jenkins masters that will consume the job requests from the queue and actually get the tests running. However, Jenkins needs two things to be able to run a job — a job definition (what to actually do) and a slave node (somewhere to do it).

    The first part — what to do — is provided by job-definitions stored in external YAML files and processed by Jenkins Job Builder (jjb) in to job configurations for Jenkins. Each Jenkins master gets these definitions pushed to it constantly by Puppet, thus each Jenkins master instance knows about all the jobs it can run automatically. Zuul also knows about these job definitions; this is the job-name part of the tuple we said it put into gearman.

    The second part — somewhere to run the test — takes some more explaining. To the next point...

  5. Several cloud companies donate capacity in their clouds for OpenStack to run CI tests. Overall, this capacity is managed by a customised orchestration tool called nodepool. Nodepool watches the gearman queue and sees what requests are coming out of Zuul. It looks at node-type of jobs in the queue and decides what types of nodes need to start and which cloud providers have capacity to satisfy demand. Nodepool will monitor the start-up of the virtual-machines and register the new nodes to the Jenkins master instances.

  6. At this point, the Jenkins master has what it needs to actually get jobs started. When nodepool registers a host to a Jenkins master as a slave, the Jenkins master can now advertise its ability to consume jobs. For example, if a ubuntu-trusty node is provided to the Jenkins master instance by nodepool, Jenkins can now consume from gearman any job it knows about that is intended to run on an ubuntu-trusty slave. Jekins will run the job as defined in the job-definition on that host — ssh-ing in, running scripts, copying the logs and waiting for the result. (It is a gross oversimplification, but for the purposes of OpenStack CI, Jenkins is pretty much used as a glorified ssh/scp wrapper. Zuul Version 3, under development, is working to remove the need for Jenkins to be involved at all. 2016-06 Jenkins has been removed from the OpenStack CI pipeline and largely replaced with Ansible. For details see this post).

  7. Eventually, the test will finish. The Jenkins master will put the result back into gearman, which Zuul will consume. The slave will be released back to nodepool, which destroys it and starts all over again (slaves are not reused and also have no sensitive details on them, as they are essentially publicly accessible). Zuul will wait for the results of all jobs for the change and post the result back to Gerrit; it either gives a positive vote or the dreaded negative vote if required jobs failed (it also handles merges to git, but we'll ignore that bit for now).

In a nutshell, that is the CI work-flow that happens thousands-upon-thousands of times a day keeping OpenStack humming along.

Image builds

So far we have glossed over how nodepool actually creates the images that it hands out for testing. Image creation, illustrated in step 8 above, contains a lot of important details.

Firstly, what are these images and why build them at all? These images are where the "rubber hits the road" — they are instantiated into the virtual-machines that will run DevStack, unit-testing or whatever else someone might want to test.

The main goal is to provide a stable and consistent environment in which to run a wide-range of tests. A full OpenStack deployment results in hundreds of libraries and millions of lines of code all being exercised at once. The testing-images are right at the bottom of all this, so any instability or inconsistency affects everyone; leading to constant fire-firefighting and major inconvenience as all forward-progress stops when CI fails. We want to support a wide number of platforms interesting to developers such as Ubuntu, Debian, CentOS and Fedora, and we also want to and make it easy to handle new releases and add other platforms. We want to ensure this can be maintained without too much day-to-day hands-on.

Caching is a big part of the role of these images. With thousands of jobs going on every day, an occasional network blip is not a minor annoyance, but creates constant and difficult to debug failures. We want jobs to rely on as few external resources as possible so tests are consistent and stable. This means caching things like the git trees tests might use (OpenStack just broke the 1000 repository mark), VM images, packages and other common bits and pieces. Obviously a cache is only as useful as the data in it, so we build these images up every day to keep them fresh.

Snapshot images

If you log into almost any cloud-provider's interface, they almost certainly have a range of pre-canned images of common distributions for you to use. At first, the base images for OpenStack CI testing came from what the cloud-providers had as their public image types. However, over time, there are a number of issues that emerge:

  1. No two images, even for the same distribution or platform, are the same. Every provider seems to do something "helpful" to the images which requires some sort of workaround.
  2. Providers rarely leave these images alone. One day you would boot the image to find a bunch of Python libraries pip-installed, or a mount-point moved, or base packages removed (all happened).
  3. Even if the changes are helpful, it does not make for consistent and reproducible testing if every time you run, you're on a slightly different base system.
  4. Providers don't have some images you want (like a latest Fedora), or have different versions, or different point releases. All update asynchronously whenever they get around to it.

So the original incarnations of OpenStack CI images were based on these public images. Nodepool would start one of these provider images and then run a series of scripts on it — these scripts would firstly try to work-around any quirks to make the images look as similar as possible across providers, and then do the caching, setup things like authorized keys and finish other configuration tasks. Nodepool would then snapshot this prepared image and start instantiating VM's from these snapshots into the pool for testing. If you hear someone talking about a "snapshot image" in OpenStack CI context, that's likely what they are referring to.

Apart from the stability of the underlying images, the other issue you hit with this approach is that the number of images being built starts to explode when you take into account multiple providers and multiple regions. Even with just Rackspace and the (now defunct) HP Cloud we would end up creating snapshot images for 4 or 5 platforms across a total of about 8 regions — meaning anywhere up to 40 separate image builds happening daily (you can see how ridiculous it was getting in the logging configuration used at the time). It was almost a fait accompli that some of these would fail every day — nodepool can deal with this by reusing old snapshots — but this leads to a inconsistent and heterogeneous testing environment.

Naturally there was a desire for something more consistent — a single image that could run across multiple providers in a much more tightly controlled manner.

Upstream-based builds

Upstream distributions do provide "cloud-images", which are usually pre-canned .qcow2 format files suitable for uploading to your average cloud. So the diskimage-builder tool was put into use creating images for nodepool, based on these upstream-provided images. In essence, diskimage-builder uses a series of elements (each, as the name suggests, designed to do one thing) that allow you to build a completely customised image. It handles all the messy bits of laying out the image file, tries to be smart about caching large downloads and final things like conversion to qcow2 or vhd.

nodepool has used diskimage-builder to create customised images based upon the upstream releases for some time. These are better, but still have some issues for the CI environment:

  1. You still really have no control over what does or does not go into the upstream base images. You don't notice a change until you deploy a new image based on an updated version and things break.
  2. The images still start with a fair amount of "stuff" on them. For example cloud-init is a rather large Python program and has a fair few dependencies. These dependencies can both conflict with parts of OpenStack or end up tacitly hiding real test requirements (the test doesn't specify it, but the package is there as part of another base dependency. Things then break when the base dependencies change). The whole idea of the CI is that (as much as possible) you're not making any assumptions about what is required to run your tests — you want everything explicitly included.
  3. An image that "works everywhere" across multiple cloud-providers is quite a chore. cloud-init hasn't always had support for config-drive and Rackspace's DHCP-less environment, for example. Providers all have their various different networking schemes or configuration methods which needs to be handled consistently.

If you were starting this whole thing again, things like LXC/Docker to keep "systems within systems" might come into play and help alleviate some of the packaging conflicts. Indeed they may play a role in the future. But don't forget that DevStack, the major CI deployment mechanism, was started before Docker existed. And there's tricky stuff with networking and Neutron going on. And things like iSCSI kernel drivers that containers don't support well. And you need to support Ubuntu, Debian, CentOS and Fedora. And you have hundreds of developers already relying on what's there. So change happens incrementally, and in the mean time, there is a clear need for a stable, consistent environment.

Minimal builds

To this end, diskimage-builder now has a serial of "minimal" builds that are really that — systems with essentially nothing on them. For Debian and Ubuntu this is achieved via debootstrap, for Fedora and CentOS we replicate this with manual installs of base packages into a clean chroot environment. We add on a range of important elements that make the image useful; for example, for networking, we have simple-init which brings up the network consistently across all our providers but has no dependencies to mess with the base system. If you check the elements provided by project-config you can see a range of specific elements that OpenStack Infra runs at each image build (these are actually specified by in arguments to nodepool, see the config file, particularly diskimages section). These custom elements do things like caching, using puppet to install the right authorized_keys files and setup a few needed things to connect to the host. In general, you can see the logs of an image build provided by nodepool for each daily build.

So now, each day at 14:14 UTC nodepool builds the daily images that will be used for CI testing. We have one image of each type that (theoretically) works across all our providers. After it finishes building, nodepool uploads the image to all providers (p.s. the process of doing this is so insanely terrible it spawned shade; this deserves many posts of its own) at which point it will start being used for CI jobs. If you wish to replicate this entire process, the build-image.sh script, run on an Ubuntu Trusty host in a virtualenv with diskimage-builder will get you pretty close (let us know of any issues!).

DevStack and bare nodes

There are two major ways OpenStack projects test their changes:

  1. Running with DevStack, which brings up a small, but fully-functional, OpenStack cloud with the change-under-test applied. Generally tempest is then used to ensure the big-picture things like creating VM's, networks and storage are all working.
  2. Unit-testing within the project; i.e. what you do when you type tox -e py27 in basically any OpenStack project.

To support this testing, OpenStack CI ended up with the concept of bare nodes and devstack nodes.

  • A bare node was made for unit-testing. While tox has plenty of information about installing required Python packages into the virtualenv for testing, it doesn't know anything about the system packages required to build those Python packages. This means things like gcc and library -devel packages which many Python packages use to build bindings. Thus the bare nodes had an ever-growing and not well-defined list of packages that were pre-installed during the image-build to support unit-testing. Worse still, projects didn't really know their dependencies but just relied on their testing working with this global list that was pre-installed on the image.
  • In contrast to this, DevStack has always been able to bootstrap itself from a blank system to a working OpenStack deployment by ensuring it has the right dependencies installed. We don't want any packages pre-installed here because it hides actual dependencies that we want explicitly defined within DevStack — otherwise, when a user goes to deploy DevStack for their development work, things break because their environment differs slightly to the CI one. If you look at all the job definitions in OpenStack, by convention any job running DevStack has a dsvm in the job name — this referred to running on a "DevStack Virtual Machine" or a devstack node. As the CI environment has grown, we have more and more testing that isn't DevStack based (puppet apply tests, for example) that rather confusingly want to run on a devstack node because they do not want dependencies installed. While it's just a name, it can be difficult to explain!

Thus we ended up maintaining two node-types, where the difference between them is what was pre-installed on the host — and yes, the bare node had more installed than a devstack node, so it wasn't that bare at all!

Specifying Dependencies

Clearly it is useful to unify these node types, but we still need to provide a way for the unit-test environments to have their dependencies installed. This is where a tool called bindep comes in. This tool gives project authors a way to specify their system requirements in a similar manner to the way their Python requirements are kept. For example, OpenStack has the concept of global requirements — those Python dependencies that are common across all projects so version skew becomes somewhat manageable. This project now has some extra information in the other-requirements.txt file, which lists the system packages required to build the Python packages in the global-requirements list.

bindep knows how to look at these lists provided by projects and get the right packages for the platform it is running on. As part of the image-build, we have a cache-bindep element that can go through every project and build a list of the packages it requires. We can thus pre-cache all of these packages onto the images, knowing that they are required by jobs. This both reduces the dependency on external mirrors and improves job performance (as the packages are locally cached) but doesn't pollute the system by having everything pre-installed.

Package installation can now happen via the way we really should be doing it — as part of the CI job. There is a job-macro called install-distro-packages which a test can use to call bindep to install the packages specified by the project before the run. You might notice the script has a "fallback" list of packages if the project does not specify it's own dependencies — this essentially replicates the environment of a bare node as we transition to projects more strictly specifying their system requirements.

We can now start with a blank image and all the dependencies to run the job can be expressed by and within the project — leading to a consistent and reproducible environment without any hidden dependencies. Several things have broken as part of removing bare nodes — this is actually a good thing because it means we have revealed areas where we were making assumptions in jobs about what the underlying platform provides. There's a few other job-macros that can do things like provide MySQL/Postgres instances for testing or setup other common job requirements. By splitting these types of things out from base-images we also improve the performance of jobs who don't waste time doing things like setting up databases for jobs that don't need it.

As of this writing, the bindep work is new and still a work-in-progress. But the end result is that we have no more need for a separate bare node type to run unit-tests. This essentially halves the number of image-builds required and brings us to the goal of a single image for each platform running all CI.

Conclusion

While dealing with multiple providers, image-types and dependency chains has been a great effort for the infra team, to everyone's credit I don't think the project has really noticed much going on underneath.

OpenStack CI has transitioned to a situation where there is a single image type for each platform we test that deploys unmodified across all our providers and runs all testing environments equally. We have better insight into our dependencies and better tools to manage them. This leads to greatly decreased maintenance burden, better consistency and better performance; all great things to bring to OpenStack CI!

Platform bootstrap for OpenStack Infrastructure

This is a terse guide on bootstrapping virtual-machine images for OpenStack infrastructure, with the goal of adding continuous-integration support for new platforms. It might also be handy if you are trying to replicate the upstream CI environment.

It covers deployment to Rackspace for testing; Rackspace is one of the major providers of capacity for the OpenStack Infrastructure project, so it makes a good place to start when building up your support story.

Firstly, get an Ubuntu Trusty environment to build the image in (other environments, like CentOS or Fedora, probably work -- but take this step to minimise differences to what the automated machinery of what upstream does). You want a fair bit of memory, and plenty of disk-space.

The tool used for building virtual-machine images is diskimage-builder. In short, it takes a series of elements, which are really just scripts run in different phases of the build process.

I'll describe building a Fedora image, since that's been my focus lately. We will use a fedora-minimal element -- this means the system is bootstrapped from nothing inside a chroot environment, before eventually being turned into a virtual-machine image (contrast this to the fedora element, which bases itself off the qcow2 images provided by the official Fedora cloud project). Thus you'll need a few things installed on the Ubuntu host to deal with bootstrapping a Fedora chroot

apt-get install yum yum-utils python-lzma

You will hit stuff like that python-lzma dependency on this road-less-travelled -- technically it is a bug that yum packages on Ubuntu don't depend on it; without it you will get strange yum errors about unsupported compression.

At this point, you can bootstrap your diskimage-builder environment. You probably want diskimage-builder from git, and then build up a virtualenv for your support bits and pieces.

git clone git://git.openstack.org/openstack/diskimage-builder
virtualenv dib_env
. dib_env/bin/activate

pip install dib-utils

dib-utils is a small part of diskimage-builder that is split-out; don't think too much about it.

While diskimage-builder is responsible for the creation of the basic image, there are a number of elements provided by the OpenStack project-config repository that bootstrap the OpenStack environment. This does a lot of stuff, including caching all git trees (so CI jobs aren't cloning everything constantly) and running puppet setup.

git clone git://git.openstack.org/openstack-infra/project-config

There's one more trick required for building the VHD images that Rackspace requires; make sure you install the patched vhd-util as described in the script help.

At this point, you can probably build an image. Here's something approximating what you will want to do

break=after-error \
TMP_DIR=~/tmp \
ELEMENTS_PATH=~/project-config/nodepool/elements \
DIB_DEV_USER_PASSWORD="password"  DIB_DEV_USER_PWDLESS_SUDO=1 \
DISTRO=23 \
./bin/disk-image-create -x --no-tmpfs -t vhd \
   fedora-minimal vm devuser simple-init \
   openstack-repos puppet nodepool-base node-devstack

To break some of this down

  • break= will help you debug failing builds by dropping you into a shell when one of the element parts fail.

  • TMP_DIR should be set to somewhere with plenty of space; a default /tmp with tmpfs is probably restricted to a couple of gigabytes; not enough for a build.

  • ELEMENTS_PATH will add the OpenStack specific elements

  • DIB_DEV_USER_* flags will create a devuser login with a password and sudo access. This is really important as it is most likely you'll boot up fairly broken the first time, and you need a way to log-in (this is not used in "production").

  • DISTRO in this case says to build a Fedora 23 based-image, but will vary depending on what you are trying to do.

  • disk-image-create finally creates the image. We are telling it to create a vhd based image, using fedora-minimal in this case. For configuration we are using simple-init, which uses the glean project to configure networking from a configuration-drive.

    • By default, this will install glean from pypi. However, adding

      ``DIB_INSTALL_TYPE_simple_init=repo``
      

      would modify the install to use the git source. This is handy if you have changes in there that are not released to pypi yet.

This goes and does its thing; it will take about 20 minutes. Depending on how far your platform diverges from the existing support, it will require a lot of work to get everything working so you can get an image out the other side. To see a rough example of what should be happening, see the logs of the official image builds that happen for a variety of platforms.

At some point, you should get a file image.vhd which is now ready to be deployed. The only reasonable way to do this is with shade. You can quickly grab this into the virtualenv we created before

pip install shade

Now you'll need to setup a clouds.yaml file to give yourself the permissions to upload the image. It should look something like

clouds:
  rax:
    profile: rackspace
    auth:
       username: your_rax_username
       password: your_rax_password
       project_id: your_rax_accountnum
    regions:
    - IAD

You should know your user-name and password (whatever you log into the website with), and when you login to Rackspace your project_id value is listed in the drop-down box labeled with your username as Account #. shade has no UI as such, so a simple script will do the upload.

import shade

shade.simple_logging(debug=True)
cloud = shade.openstack_cloud(cloud='rax')
image = cloud.create_image('image-name', filename='image.vhd', wait=True)

Now wait -- this will also take a while. Even after upload it takes a fair while to process (you will see the shade debug output looping around some glance calls seeing if it is ready). If everything works, the script should return and you should be able to see the new image in the output of nova list-images.

At this point, you're ready to try booting! One caveat is that the Rackspace web interface does not seem to give you the option to boot with a configuration drive available to the host, essential for simple-init to bring up the network. So boot via the API with something like

nova boot --flavor=2 --image=image-uuid --config-drive 1 test-image

This should build and boot your image! This will allow you to open a whole new door of debugging to get your image booting correctly.

You can now iterate by rebuilding/uploading/booting as required. Note these are pretty big images, and uploaded in broken-up swift files, so I find swift delete --all helpful to reset between builds (obviously, I have nothing else in swift that I want to keep). The Rackspace java-based console UI is rather annoying; it cuts itself off every time the host reboots. This makes it quite difficult to catch the early bootup, or modify grub options via the boot-loader, etc. You might need to fiddle timeout options, etc in the image build.

If you've managed to get your image booting and listening on the network, you're a good-deal of the way towards having your platform supported in upstream OpenStack CI. At this point, you likely want to peruse the nodepool configuration and get an official build happening here. Once that is up, you can start the process of adding jobs that use your platform to test!

Don't worry, there's plenty more that can go wrong from here -- but you're on the way! OpenStack infra is a very dynamic environment, which many changes in progress; so in general, #openstack-infra on freenode is going to be a great place to start looking for help.