Converting DICOM images, part 2

In a previous post I discussed converting medical images. I tried again today and hit another issue which could do with some google help.

If you see the following:

$ dcm2pnm --all-frames input.dcm
E: can't change to unencapsulated representation for pixel data
E: can't determine 'PhotometricInterpretation' of decompressed image
E: can't decompress frame 0: Illegal call, perhaps wrong parameters
E: can't convert input pixel data, probably unsupported compression
F: Invalid DICOM image

and dcmdump reports somewhere:

# Dicom-Data-Set
# Used TransferSyntax: JPEG Baseline

Try the ``dcmj2pnm`` program, rather than dcm2pnm. The man page does mention this, but that assumes that you know you have a JPEG encoded image :) It works the same, can extract multiple frames and can be converted to a movie as discussed in the previous post. Easy when you know how!

vi backup files considered harmful

Mark this one down as another in the long list of "duh" — once you realise what is going on!

Bug report comes in about a long running daemon that has stopped logging. lsof reports the log file is now named logfile~ and further more is deleted! This happens after a system upgrade scenario, so of course I go off digging through a multitude of scripts and what-not to find the culprit...

Have you got it yet?

Try this...

# lsof | grep syslogd | grep messages
syslogd    1376        root   15w      REG        3,1    99851    4605625 /var/log/messages
# cd /var/log/
# vi messages (and save the file)
root@jj:/var/log# lsof | grep syslogd | grep messages
syslogd    1376        root   15w      REG        3,1    99851    4605625 /var/log/messages~ (deleted)

vi is very careful and renames your existing file, so that if anything goes wrong when writing the new version you can get something back. It's a shame the daemon doesn't know about this! The kernel is happy to deal with the rename, but when the backup file is unlinked you're out of luck. Confusingly to a casual inspection your log file looks like it's there ... just that nothing is going into it. (oh, and if you tried that, you might like to restart syslogd now :)

Moral of the story -- overcome that finger-memory and never use vi on a live file; you're asking for trouble!

SIGTTOU and switching to canonical mode

Here's an interesting behaviour that, as far as I can tell, is completley undocumented, sightly consfusing but fairly logical. Your program should receive a SIGTTOU when it is running in the background and attempts to output to the terminal -- the idea being that you shouldn't scramble the output by mixing it in while the shell is trying to operate. Here's what the bash manual has to say

Background processes are those whose process group ID differs from the
terminal's; such processes are immune to key- board-generated signals.
Only foreground processes are allowed to read from or write to the
terminal.  Background processes which attempt to read from (write to)
the terminal are sent a SIGTTIN (SIGTTOU) signal by the terminal
driver, which, unless caught, suspends the process.

So, consider the following short program, which writes some output and catches any SIGTTOU's, with an optional flag to switch between canonical and non-canonical mode.

#include <stdio.h>
#include <stdlib.h>
#include <signal.h>
#include <termios.h>
#include <unistd.h>

static void sig_ttou(int signo) {
   printf("caught SIGTTOU\n");
   signal(SIGTTOU, SIG_DFL);
   kill(getpid(), SIGTTOU);
}

int main(int argc, char *argv[]) {

   signal(SIGTTOU, sig_ttou);

   if (argc != 1) {
      struct termios tty;

      printf("setting non-canoncial mode\n");
      tcgetattr(fileno(stdout), &tty);
      tty.c_lflag &= ~(ICANON);
      tcsetattr(fileno(stdout), TCSANOW, &tty);
   }

   int i = 0;
   while (1) {
      printf("  *** %d ***\n", i++);
      sleep(1);
   }
}

This program ends up operating in an interesting manner.

  1. Run in the background, canonical mode : no SIGTTOU and output gets multiplexed with shell.

    $ ./sigttou &
      *** 0 ***
    [1] 26171
    $   *** 1 ***
      *** 2 ***
      *** 3 ***
    
  2. Run in the background, non-canonical mode : SIGTTOU delivered

    $ ./sigttou 1 &
    [1] 26494
    ianw@jj:/tmp$ setting non-canoncial mode
    caught SIGTTOU
    
    
    [1]+  Stopped                 ./sigttou 1
    
  3. Run in the background, canonical mode, tostop set via stty : SIGTTOU delivered, seemingly after a write proceeds

    $ stty tostop
    $ ./sigttou &
    [2] 26531
    ianw@jj:/tmp$   *** 0 ***
    caught SIGTTOU
    
    
    [2]+  Stopped                 ./sigttou
    

You can see a practical example of this by comparing the difference between cat file & and more file &. The semantics make some sense -- anything switching off canonical mode is like to be going to really scramble your terminal, so it's good to stop it and let it's terminal handling functions run. I'm not sure why canoncial background is considered useful mixed in with your prompt, but someone, somewhere must have decided it was so.

Update: upon further investigation, it is the switching of terminal modes that invokes the SIGTTOU. To follow the logic through more, see the various users of tty_check_change in the tty driver.
Converting DICOM images

If you go for an ultrasound or some other imaging procedure, they may give you a CD with the images that requires some overly complicated and under-featured Windows viewer. Chances are these images are in DICOM format, which is like the AVI of the medical world.

Your first clue will be that file might report the file as an unoptimised QuickTime movie, e.g.

$ file ./QMAG0001
./QMAG0001: Apple QuickTime movie (unoptimized)

After figuring out the file type wasn't actually anything to do with QuickTime, I tried some of the many different tools and methods to convert this to something viewable. Unfortunatley, the DICOM viewer in GIMP and ImageMagick (probably the same thing?) didn't like the files at all, and neither did a range of other tools. I finally managed to do it with the dcm2pnm tool from the Debian `dcmtk <http://packages.debian.org/sid/dcmtk>`_ package -- just point it at the file and it spits out a PNM which is easily converted by all graphics tools.

You can also encapsulate a series of images in a DICOM file, like a little movie. dcm2pnm extracts these easily, but requires the --all-frames options. An ffmpeg recipe to turn these extracted files into a more easily viewable movie is:

$ ffmpeg -qscale 5 -r 20 -b 9600 -i foo.%d.ppm movie.mp4

I certainly can't guarantee this will actually work for you, as DICOM appears to be an extremely complicated format with many possible vendor extensions. But hopefully it's a starting point!

NoMachine NX - the missing non-manual

I've been meaning to try NoMachine NX for a while. Its promise of fast remote X11 sessions sounded exactly like what I wanted to log into my work desktop remotely (I really like having a remote desktop with saved state you can just pick up from when using remote access). That was pretty much all I knew about the software, so I was a completely blank slate.

The getting started guide is the perfect example of how not to write a getting started guide.

Firstly, Section 1 - "Getting started" - gives me a full history of the product, goes into significant depth about the challenges of forwarding X11 requests, talks about the caching and compression implementation, round-trip latency measurement, the details of two-way proxying system and discusses every other feature of the software.

My eyes glazed over after about the first paragraph. That's all great -- I just want to know what to do!

At this point, I assume that I'm required to run some sort of daemon at the remote end. I download and install the server package (it is explained that the server package requires the client and agent packages as well, fine).

I'm paging down, looking for something to get me started. I'm happy to see Section 7 - "Set up your NX Server environment" (remember, at this point I though I needed some daemon running in the background constantly). It even has some commands commands to type, so I tap away, running nxserver --useradd nxtest --system. My server binary doesn't even seem to recognise these options. I give up, assuming that the server isn't running and nothing will work. The getting started guide has abruptly ended and I have no idea what to do.

As it turns out, it's all completely trivial. Here's the missing "getting started guide".

  • Download and install the client, agent and server packages on the remote end. You need to have ssh access to this box.
  • Install the client on your end.
  • Run /usr/NX/bin/nxclient. It will start a wizard where you input the remote host name.
  • The client will, under the hood, ssh to the remote end, open the tunnel it needs, start the server and do all the magic required to make things "just work". A remote desktop will appear.
  • That's it!

Additional tips:

  • It's easy to tunnel this connection (for example, if you have to bounce through a ssh gateway to your internal network). Do something like /usr/NX/bin/nxssh -o 'Compression=no' -L 2022:remote.host:22 -f -N user@sshgateway.company.com and then connect the client to localhost:2022. You don't want to compress this link, as NX is already doing it.
  • The only way I can find to make a new session is to start nxclient with the --wizard command.
  • Don't click "Disable encryption of all traffic" if you're tunneling. AFAICT this tries to redirect the client to a non-encrypted port, which obviously won't get through.

Other than the documentation, it really works as promised, making remote X11 usable. One really nice feature is that it is smart about the resolution of the remote desktop, filling up your local screen. Add to that you don't need anything setup but your normal ssh connection, and it's a great remote desktop solution.

Spice hacking

Sick of a ridiculous pile of tiny bottles falling everywhere in your cupboard?

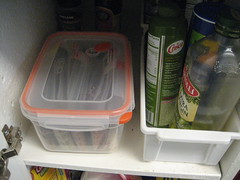
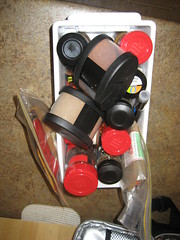
Many people will sell you many expensive solutions. However, I think we've hit on something cheap, effective and practical; zip-lock bags in a deep tub, labelled with sticky tags.

  • Easy to find.
  • Easy to get any sized spoon into the bags, or for tipping if you just open a corner.
  • For freshness, you can vaccuum seal with a straw a-la Alton Brown.
  • Buy the cheap spices in bulk and pay significantly less.
  • The more expensive bags with two rows of sealing are a little easier to close, if they come in a good size for your container.
  • Label with the date if you know it.
Spice rack Spice rack Spice rack

How to find the current glibc version

A recent post reminded me of a problem I once had; determine the glibc version and its support for various things.

There's actually a little known but useful confstr call defined for just this sort of thing. Here's a minimal example:

#include <stdio.h>
#include <unistd.h>
#include <alloca.h>
#include <string.h>

int main (void)
{
        size_t n = confstr (_CS_GNU_LIBC_VERSION, NULL, 0);
        if (n > 0)
        {
                char *buf = alloca (n);
                confstr (_CS_GNU_LIBC_VERSION, buf, n);
                printf("%s\n", buf);
        }
        return 0;
}

man confstr has all the details. If you don't need it in your program, you can also just run /lib/libc/so.6 and it will print out it's version info, e.g.

$ /lib/libc.so.6
GNU C Library stable release version 2.7, by Roland McGrath et al.
Copyright (C) 2007 Free Software Foundation, Inc.
This is free software; see the source for copying conditions.
There is NO warranty; not even for MERCHANTABILITY or FITNESS FOR A
PARTICULAR PURPOSE.
Compiled by GNU CC version 4.3.1 20080523 (prerelease).
Compiled on a Linux >>2.6.24.4<< system on 2008-06-02.
Available extensions:
    crypt add-on version 2.1 by Michael Glad and others
    GNU Libidn by Simon Josefsson
    Native POSIX Threads Library by Ulrich Drepper et al
    BIND-8.2.3-T5B
For bug reporting instructions, please see:
<http://www.gnu.org/software/libc/bugs.html>.

There's also another glibc trick that often comes in useful; the LD_DEBUG environment variable. Start with help and you can get more details from there.

$ LD_DEBUG=help ls
Valid options for the LD_DEBUG environment variable are:

  libs        display library search paths
  reloc       display relocation processing
  files       display progress for input file
  symbols     display symbol table processing
  bindings    display information about symbol binding
  versions    display version dependencies
  all         all previous options combined
  statistics  display relocation statistics
  unused      determined unused DSOs
  help        display this help message and exit

To direct the debugging output into a file instead of standard output
a filename can be specified using the LD_DEBUG_OUTPUT environment variable.

Netgear WG311 shielding

I recently picked up the Netgear WG311 V3 very cheap from Office Depot.

The card seems to work fine with ndiswrapper; there are other guides on getting it working.

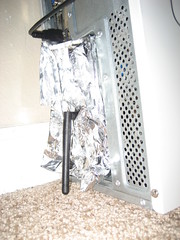
The first problem was the reception was, in a word, rubbish. After putting the box back in it's usual home the house wireless was lucky to get a 7/100 signal rating. I found a work-around while the cheap external antenna I ordered is arriving; shield the antenna with foil. This increased signal to between 30-40/100, a considerable boost making it actually useful.

Cheap RF Shielding

The second problem was coming to terms with wpa_supplicant, of which the details often become very confusing very quickly. Here's the Debian 2-second guide for a simple, standard WPA network I was looking for:

  1. Add to /etc/network/interfaces

    iface wlan0 inet dhcp
    # Useful with ifup -v
    #    wpa-debug-level 3
         wpa-conf /etc/wpa_supplicant.conf
    
  2. /etc/wpa_supplicant.conf should look like:

    network={
            ssid="your_ssid"
            psk="your_password"
            key_mgmt=WPA-PSK
            proto=WPA
    }