Shared memory on Linux

You may have noticed a range of things mounted on a tmpfs file system.

$ mount | grep tmpfs
tmpfs on /lib/init/rw type tmpfs (rw,nosuid,mode=0755)
udev on /dev type tmpfs (rw,mode=0755)
tmpfs on /dev/shm type tmpfs (rw,nosuid,nodev)

tmpfs is actually more pervasive than it might appear. It was created to build a filesystem interface ontop of shared pages of RAM. This is useful because there are a number of ways to access shared RAM; notably SysV IPC Shared Memory (shmget, shmat, etc) and mmap of anonymous memory (MAP_ANONYMOUS).

In order to have a consistent infrastructure implementing all of this the kernel abstracts RAM as a filesystem and your mapping as a file. To this end the tmpfs filesystem was created to present this abstraction. It deals with issues such as caching, security and the ability to swap pages in a consistent manner (i.e. using the same infrastructure every other file system does).

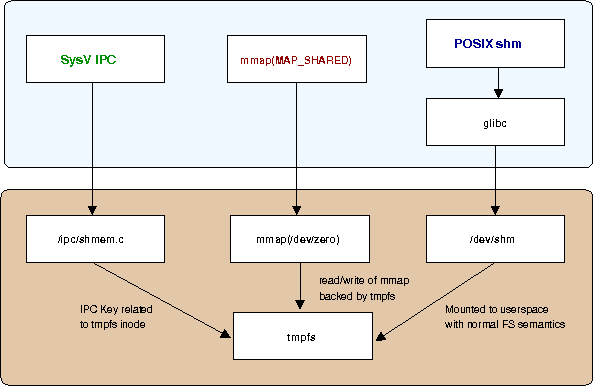
Linux shared memory overview

Overall, tmpfs is implemented in mm/shmem.c. In the initialisation function the file system is mounted internally by the kernel with vfs_kern_mount so it is always around. It gets fairly complicated because it has to keep track of swapped out pages and the general complexity that come with implementing a full filesystem.

As described above, there are several distinct ways to get access to this file system.

  • The SysV IPC shared memory layer (ipc/shm.c) is a wrapper layer which manages IPC keys and internally plugs itself into the tmpfs code. Essentially creating a key with shmget() ends up calling ipc/shmem.c:newseg() which calls mm/shmem.c:shmem_file_setup() which then creates a struct file for the shared memory. This new file reuses the file operations from the tmpfs filesystem, but is not actually put into the file system (i.e. linked to the superblock). When shat() is called to attach to this memory the SysV IPC layer will internally translate this into a mmap of this file. This is what is used by the Shared Global Area of Oracle and some Java implementations, amongst many other things (see /proc/sysvipc/shm for a comprehensive list).

  • The second common thing to do is an anonymous mmap. By default MAP_ANONYMOUS ignores the file-descriptor, but an analagous methodology is to explicitly map /dev/zero. If you look at the implementation of /dev/zero in drivers/char/mem.c you can see code such as

    static int mmap_zero(struct file * file, struct vm_area_struct * vma)
    {
            int err;
    
            if (vma->vm_flags & VM_SHARED)
                    return shmem_zero_setup(vma);
    

    which ends up backing shared areas with tmpfs.

  • The third way is actually mounting tmpfs and using it from userspace as a normal file system. glibc implements the POSIX shared memory call shm_open by creating and mmaping files on a tmpsfs mount (by default looking in /dev/shm). Other utilities also use the tmpfs semantics and mount it at other points; the obvious one of course being mounting /tmp on it!

tmpfs: more than meets the eye!

Update: hopefully a little clearer, thanks to Helge Bahmann for comments.

Function Pointers and Addresses of Functions

On many architectures, calling a function does not just mean jumping straight to an address. For example, on Itanium calling a function involves setting a global pointer register before jumping to the function code. The global pointer is used as a known fixed point which can be offset against very quickly. Thus a function is described by two things; the code address and a global pointer value. Unsurprisingly, this information is kept in a function descriptor.

Now, the general process when calling a function from a dynamically linked library is as follows:

  1. Your code calls a stub entry in the Procedure Lookup Table (PLT).
  2. The PLT stub reads the function descriptor (address and GP) to call from the Global Offset Table (GOT).
  3. At first, this will refer to a function in the dynamic linker which will find the library and function you actually want to call, and then patch the GOT function descriptor entry so next time the PLT stub looks at it, you go there directly.

This all works fine. The problem occurs when you try to take the address of a function. On x86 you can just read the function address from the GOT and return it. However, with function descriptors you can not just return the code address -- it is invalid to call the function without the GP set correctly. You can't return the address of your copy of function descriptor, because then what should be the same function doesn't have the same address, which is obviously incorrect.

The Itanium solution is an "official" function descriptor. This is kept by the dynamic linker in private memory, and whenever a function address is requested it will be returned. Consider pretty much the smallest possible example:

$ cat libtest.c
void* function(void)
{
    return function;
}

$ cat test.c
extern void* function(void);

int main(void)
{
        void*(*ptr)(void) = function;
}

$ gcc -shared -o libtest.so ./libtest.c
$ gcc -o test test.c -Wl,-L. -ltest

If we have a look at the relocations in the library we see the following

$ readelf --relocs ./libtest.so

Relocation section '.rela.dyn' at offset 0x440 contains 10 entries:
  Offset          Info           Type           Sym. Value    Sym. Name + Addend
[...]
000000010cc0  000b00000047 R_IA64_FPTR64LSB  00000000000007c0 function + 0

hen the dynamic linker is going through the relocations, it responds to any R_IA64_FPTR64LSB relocations by creating a new official function descriptor.

Now we can have a look at the binary

$ readelf --relocs ./test

Relocation section '.rela.dyn' at offset 0x458 contains 3 entries:
  Offset          Info           Type           Sym. Value    Sym. Name + Addend
[...]
6000000000000e80  000400000047 R_IA64_FPTR64LSB  0000000000000000 function + 0

This is a bit different, and requires some more investigation. Firstly lets look at the disassembly:

40000000000007c0 <main>:
40000000000007c0:       02 10 00 18 00 21       [MII]       mov r2=r12
40000000000007c6:       e0 40 05 00 48 00                   addl r14=40,r1;;
40000000000007cc:       00 00 04 00                         nop.i 0x0
40000000000007d0:       0a 70 00 1c 18 10       [MMI]       ld8 r14=[r14];;
40000000000007d6:       00 70 08 30 23 80                   st8 [r2]=r14
40000000000007dc:       01 10 00 84                         mov r12=r2
40000000000007e0:       11 00 00 00 01 00       [MIB]       nop.m 0x0
40000000000007e6:       00 00 00 02 00 80                   nop.i 0x0
40000000000007ec:       08 00 84 00                         br.ret.sptk.many b0;;

We know that r1 points to the GOT (in fact, that is the GP value). We see that r14 is being loaded with a value from the GOT which is then de-referenced. Notice the offset of the address, correlating with the section output

There are 41 section headers, starting at offset 0x1690:

Section Headers:
  [Nr] Name              Type             Address           Offset
       Size              EntSize          Flags  Link  Info  Align
[...]
  [25] .got              PROGBITS         6000000000000e58  00000e58
       0000000000000050  0000000000000000 WAp       0     0     8

Now, 0x6000000000000e80 - 0x6000000000000e58 = 0x28 = 40 which is the offset we are loading from the GOT! So we can deduce that a R_IA64_FPTR64LSB relocation with a symbol value of 0 gets the dynamic linker to setup a pointer to the official function descriptor in the GOT. This is the value returned when you take the address of a function, so now function comparisions work!

Power and PA-RISC are two other examples of architectures that use function descriptors. I think they are generally a feature of architectures who are not register-starved, because you generally pass along a pointer value to global data, which makes offsetting into that global data much faster than looking it up from memory.

What actually happens when you plug in a USB device?

Today I started wondering what actually happens when you plug in a USB device. The little tour below goes from starting the USB subsystem to plugging something in, and I hope it is reasonably accurate. This entry is probably best read with a copy of the Linux kernel handy.

Linux USB Core, lower-layers

We can start our tour right at the very bottom in the heart of the USB core.

Things really start at the USB initialisation function in drivers/usb/core/usb.c:usb_init(). The first interesting call is to drivers/base/bus.c:bus_register(). We see that it passes as struct bus_type which looks like:

struct bus_type usb_bus_type = {
        .name =         "usb",
        .match =        usb_device_match,
        .uevent =       usb_uevent,
        .suspend =      usb_suspend,
        .resume =       usb_resume,
};

This is registering a new type of bus with the Linux driver core framework. The bus doesn't have much yet, just a name and some helper functions, but registering a bus sets up the kobject hierarchy that gets exported through /sys/bus/ (/sys/bus/usb in this case) and will allow the further hierarchical building of devices underneath by attaching them as the system runs. This is like the root directory of the USB system.

Your desktop/laptop/palmtop etc has a host controller which directly interfaces to USB devices; common types are UHCI, OHCI and EHCI. The drivers for these various types of controllers live in drivers/usb/host. These controllers are similar but different, so to minimise code duplication Linux has a Host Controller Driver framework (drivers/usb/core/hcd.c) which abstracts most of the common operations from the host controller driver.

The HCD layer does this by keeping a struct usb_hcd (drivers/usb/core/hcd.h) with all common information in it for a host controller. Each of host controller drivers fills out a struct hc_driver for its hardware dependent operations, as per below (taken from the UHCI driver)

static const struct hc_driver uhci_driver = {
        .description =          hcd_name,
        .product_desc =         "UHCI Host Controller",
        .hcd_priv_size =        sizeof(struct uhci_hcd),

        /* Generic hardware linkage */
        .irq =                  uhci_irq,
        .flags =                HCD_USB11,

        /* Basic lifecycle operations */
        .reset =                uhci_init,
        .start =                uhci_start,
#ifdef CONFIG_PM
        .suspend =              uhci_suspend,
        .resume =               uhci_resume,
        .bus_suspend =          uhci_rh_suspend,
        .bus_resume =           uhci_rh_resume,
#endif
        .stop =                 uhci_stop,

        .urb_enqueue =          uhci_urb_enqueue,
        .urb_dequeue =          uhci_urb_dequeue,

        .endpoint_disable =     uhci_hcd_endpoint_disable,
        .get_frame_number =     uhci_hcd_get_frame_number,

        .hub_status_data =      uhci_hub_status_data,
        .hub_control =          uhci_hub_control,
};

USB overview

It might be helpful to clarify a few USB concepts now. A USB device defines a group of end-points, where are grouped together into an interface. An end-point can be either "IN" or "OUT", and sends data in one direction only. End-points can have a number of different types:

  • Control end-points are for configuring the device, etc.
  • Interrupt end-points are for transferring small amounts of data. They have higher priority than ...
  • Bulk end-points, who can transfer more data but do not get guaranteed time constraints.
  • Isochronous transfers are high-priority real-time transfers, but if they are missed they are not re-tried. This is for streaming data like video or audio where there is no point sending data again.

There can be many interfaces (made of multiple end-points) and interfaces are grouped into "configurations". Most devices only have a single configuration.
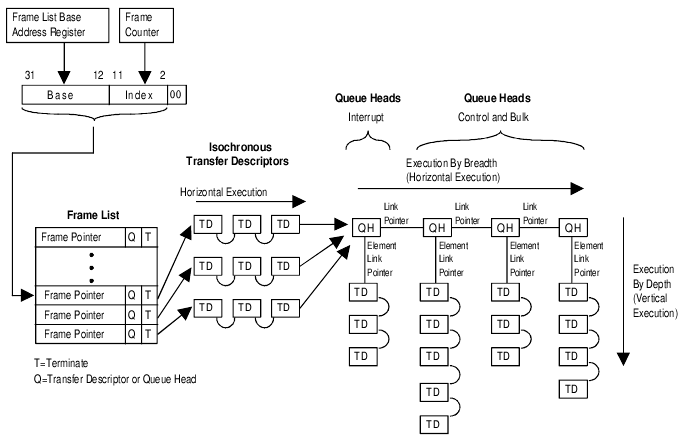
Intel UHCI

You can see how this works at the host controller level with the above diagram clagged from the Intel UHCI documents. The controller has a "frame" register which is incremented every millisecond. Each frame pointer points to a queue of "transfer descriptors". The driver needs to schedule this work so that 90% of the time is given to isochronous data, and 10% left for control data. Should any time remain, the bulk data is transferred. You can see that any transfer descriptor for isochronous data will not be retried, but other data sits in a queue so it is never lost.

The USB layer communicates through USB request blocks, or URBs. A URB contains information about what end-point this request relates to, data, any related information or attributes and a call-back function to be called when the URB is complete. Drivers submit URBs to the USB core, which manages them in co-ordination with the USB host (see the urb_enqueue functions provided by the host driver). Your data gets sent off to the USB device by the USB core, and when its done your call-back is triggered.

Root Hub

There is one more element quite fundamental to the USB core, which is the hub -- all USB devices plug into a hub. The USB controller implements a root hub; you can have multiple root hubs in a machine, and other hubs can then connect to root hubs. The hub driver lives in drivers/usb/core/hub.c. The USB initialisation function starts up the khubd thread (drivers/usb/core/hub.c:usb_hub_init()) which waits for and handles USB events, but we will return to that later.

The hub driver is the first USB driver to be setup, so by examining how that works we can get a feel for how other drivers work.

The hub driver setup starts in drivers/usb/core/usb.c:usb_init() where the drivers/usb/core/hub.c:usb_hub_init() function is called. This calls drivers/usb/core/driver.c:usb_register_driver() which adds itself to the USB bus we mentioned previously. This sets up usb_probe_device() to handle any probe events from the Linux driver core. At this point the hub driver is ready to claim anything that looks like a USB hub.

The root hub setup phase comes out of the HCD setup phase, which proceeds something like this. The Linux driver core goes through all devices on the PCI bus (including the USB host controller of course) and calls the probe() function the device's driver has registered (the host controller registered itself in its initialisation function drivers/usb/core/uhci-hcd.c:uhci_hcd_init()). The USB host controller driver wires up the HCD layer function drivers/usb/core/hcd-pci.c:usb_hcd_pci_probe() to handle this probe (see struct pci_driver uhci_pci_driver in uhci-hcd.c; usb_hcd_pci_probe() does some generic setup, but then calls back into the host driver start() function to do any device specific setup).

usb_hcd_pci_probe() ends up calling drivers/usb/core/hcd.c:usb_add_hcd() which does some generic HCD setup and ends up calling register_root_hub().

register_root_hub() creates a new USB device and registers it with drivers/usb/core/hub.c:usb_new_device(). usb_new_device() first calls drivers/usb/core/config.c:usb_get_configuration which sets up the interface (all hubs only have one interface; the interrupt interface to notify of events on the hub) for the device before registering with the Linux driver core via drivers/base/core/device_add(). device_add() then causes the USB bus to be rescanned.

Binding root hub to a driver

Now we can examine how a USB device gets associated with a driver. To summarise, what needs to happen is the hub driver needs to bind to the host controllers root hub. This illustrates the general concept of a new device binding to a driver.

There is, believe it or not, more layers that come into play now. There is a "generic" USB driver that handles the setup of interfaces in the USB core. As we mentioned earlier a device has a series of end-points grouped together into an interface, and then may have multiple interfaces for different things. Drivers really only care about communicating with the device at the interface level, so the USB core takes care of getting things to this stage for you.

In drivers/usb/core/usb.c:usb_init() the final call is to drivers/usb/core/driver.c:usb_register_device_driver(). This does some simple wrapping of the driver, most importantly setting up usb_probe_device() to handle any probes. It then registers this with Linux driver core with a call to driver_register.

Remembering that drivers/usb/hub.c:usb_new_device() has called device_add(), the driver core will now see this new device and start probing for a driver to handle it. The USB generic driver is going to be called, which has registered drivers/usb/core/driver.c:usb_probe_device() as its probe function. This converts the Linux driver core device back to a USB device (i.e. the USB device that was registered by register_root_hub()) and calls calls the drivers probe function drivers/usb/core/generic.c:generic_probe().

The role of the generic driver is to get the interfaces on the device up and running. Firstly it calls drivers/usb/generic.c:choose_configuration() which simply reads through the device data and chooses a sane configuration. But wait, how does it know what is a sane configuration for the root hub? All the information has been "faked" for the root hub in drivers/usb/core/hcd.c:usb2_rh_dev_descriptor and the like. The root hub details are defined by the USB specification, so these can be kept statically.

Assuming everything is OK, drivers/usb/core/message.c:usb_set_configuration() is called to set up the chosen configuration. It uses the helper function usb_control_message() to send a message to the device about what configuration mode to go into. It then goes through the available interfaces setting up the kernel structures, and adds them with device_add().

Inch by inch, we are getting closer to having the USB system up and running. When a new interface is added, the driver core will now try and find a driver to handle it. When an interface driver is registered with drivers/usb/core/driver.c:usb_register_driver() it sets the probe function to drivers/usb/core/driver.c:usb_probe_interface(). So the driver core calls this function, and the first thing it does is checks the ID against the IDs the driver is happy to handle from the drivers id_table. It uses usb_match_one_id() for this, which can match the class, subclass and protocol to make sure the it will work with this driver.

The root hub is part of the hub class, so can be handled by the hub driver. Therefore drivers/usb/core/hub.c:hub_probe() will be called to get the hub driver to bind with the new hub. This does some sanity checking and calls into hub_configure(). This then does some more general setup, but things get interesting when the interrupt end-point is setup. The interrupt end-point on a hub will send an event whenever something happens on the hub, such as a device being plugged in or unplugged. This is done by creating a URB and binding it to the end-point, asking that hub_irq be called whenever this URB is complete (e.g. when an event is received).

New events on the hub

At this point, the system is waiting for something to happen. The root hub is setup and listening for new events - we are ready to plug in our device.

When this happens the host controller will raise an interrupt signalling that one of its ports has changed state. This will be handled by drivers/usb/host/uhci-hcd.c:uhci_irq(). This checks that the interrupt wasn't due to an error and then calls drivers/usb/host/uhci-q.c:uhci_scan_schedule(). This function implements the interface between the UHCI "transfer data" messages and the Linux URB scheme. It goes through the queues as illustrated in the figure above and finds any complete URBs and calls their completion function.

You may remember that the interrupt end-point of the hub was associated with a URB that would call drivers/usb/core/hub.c:hub_irq(). The UHCI code will go through it's queues, find that this URB is complete and therfore call the completion function.

We previously mentioned that the kernel starts the khubd daemon to handle hub events. We can see that hub_irq does some simple error checking, but its real job is to notify khubd that there is a new event on this hub.

hub_events() is the khubd daemon thread doing all the work. Once notified the hub has new event, it goes and reads the hub status to see what to do. A new device appearing will trigger a port change event, which is handled by hub_port_connect_change(). This does some initial setup of the device, but most importantly now calls usb_new_device().

At this point, if the USB driver for this device is loaded, the device is essentially ready to go. As with the root hub, the device will be probed and its interfaces found with the generic driver, and then those interfaces will be registered and any driver asked if they wish to bind to them.

Loading drivers

The question arises, however, about how modules are dynamically loaded. Keeping every single module for every possible USB device that may plug into the system is clearly sub-optimal, so we wish to load a device driver module only when required.

Most everyone is aware of udev which handles /dev device nodes these days. udev sits around listening for uevents which get sent to it via the kernel. These uevents get sent via netlink, which is like Unix sockets but different. To get uevent messages all you need to do is open a PF_NETLINK socket to the NETLINK_KOBJECT_UEVENT "port", e.g. as the code below extract from udev does.

memset(&snl, 0x00, sizeof(struct sockaddr_nl));
snl.nl_family = AF_NETLINK;
snl.nl_pid = getpid();
snl.nl_groups = 1;

uevent_netlink_sock = socket(PF_NETLINK, SOCK_DGRAM, NETLINK_KOBJECT_UEVENT);
if (uevent_netlink_sock == -1) {
   err("error getting socket: %s", strerror(errno));
   return -1;
}

So we have udev sitting around up in userspace waiting for messages that come from the kernel (as a side note, if /sys/kernel/uevent_helper is filled in with a path that will be run and receive the events with environment variables set; this is useful in early boot before udev has started.

Thus we want to get a message out to udev that there is a new USB interface around, and it should try and load a module to bind to it.

We previously identified drivers/usb/core/message.c:usb_set_configuration() as reading the interfaces for a device and registering them with the driver core. When this registers the interface, it also registers a uevent helper drivers/usb/core/message.c:usb_if_uevent(). This function gets called by the Linux driver core when the driver is added into the driver hierarchy. It adds some information to the uevent:

if (add_uevent_var(envp, num_envp, &i,
       buffer, buffer_size, &length,
       "INTERFACE=%d/%d/%d",
       alt->desc.bInterfaceClass,
       alt->desc.bInterfaceSubClass,
       alt->desc.bInterfaceProtocol))
    return -ENOMEM;

if (add_uevent_var(envp, num_envp, &i,
       buffer, buffer_size, &length,
       "MODALIAS=usb:v%04Xp%04Xd%04Xdc%02Xdsc%02Xdp%02Xic%02Xisc%02Xip%02X",
       le16_to_cpu(usb_dev->descriptor.idVendor),
       le16_to_cpu(usb_dev->descriptor.idProduct),
       le16_to_cpu(usb_dev->descriptor.bcdDevice),
       usb_dev->descriptor.bDeviceClass,
       usb_dev->descriptor.bDeviceSubClass,
       usb_dev->descriptor.bDeviceProtocol,
       alt->desc.bInterfaceClass,
       alt->desc.bInterfaceSubClass,
       alt->desc.bInterfaceProtocol))
    return -ENOMEM;

udev now has all the information required ask modprobe to load a module, if it can. The rule on my system looks something like:

# load the drivers
ENV{MODALIAS}=="?*",    RUN+="/sbin/modprobe --use-blacklist $env{MODALIAS}"

Now, all going well, modprobe loads an appropriate module based on the vendor id, etc. Loading the driver causes a re-scan of the USB bus and the driver will be probed to see if wants to handle any of the unbinded USB devices (using the same procedure as was done setting up the root hub). It should take over control of the device, and that's it your USB device is up and running!

Simple!

Handy resources if you want to know more: Linux Device Drivers, USB2 Specification, UHCI Design Guide.
Stopping at program at exit

Today I wanted a way to run a program to completion but stop it just before it is destroyed, therefore allowing me to inspect some /proc variables I was interested in.

As it happens the ptrace option PTRACE_O_TRACEEXIT is designed for just that. To use it, you first either attach to the process, or if forking a new process call PTRACE_TRACEME and exec as usual.

Then you use the ptrace call PTRACE_SETOPTIONS with the PTRACE_O_TRACEEXIT option in the data pointer, and wait for the traced process as usual (unfortunately due to a bug you will have to clag the #defines from the kernel header for now). There are now two conditions to handle:

  1. The child received a SIGTRAP with the PTRACE_EVENT_EXIT status set, signalling to us that it has exited. This is a terminal state; you can inspect the registers, etc, but the process can not come back to life now. This status is "overloaded" in the status returned by wait, e.g.

    /* wait for signal from child */
    waitpid(pid, &status, 0);
    
    /* any signal stops the child, so check that the incoming signal is a
    SIGTRAP and the event_exit flag is set */
    
    if ((WSTOPSIG(status) == SIGTRAP) &&
        (status & (PTRACE_EVENT_EXIT << 8)))
         ...
    
  2. Any other signal will have also caused the tracing parent to be woken, so we need to pass that signal through to the child process with a PTRACE_CONT call specifing the signal in the data pointer; e.g.

    /* if not, pass the original signal onto the child */
    if (ptrace(PTRACE_CONT, pid, 0, WSTOPSIG(status))) {
           perror("stopper: ptrace(PTRACE_CONT, ...)");
               exit(1);
    }
    

A straight forward example is stopper.c. The program allows you to run a program (or attach to a running program) and effecitvley pause it just before it exits, allowing you to inspect it and then manually dispose of it once you have the data you need.

Network Manager, PPTP

After this post by Stephen Thorne I was inspired to get PPTP tunneling working with network manager so I can easily get online at LCA2007, and you all can't see what I'm surfing. The plan is to tunnel back through my house. Here is a terse overview of what I did

  1. Install network-manager package.

  2. Remove entries from /etc/network/interfaces. That pretty much gets network manager working.

  3. Restart network manager with sudo /etc/dbus-1/event.d/25NetworkManager restart. Generally do this after you fiddle with anything behind network-managers back.

  4. Look for network-manager-pptp package, realise it is only on Ubuntu. Rebuild for debian. Install and restart

  5. On my home router, forward port 1723 to my server.

  6. Install pptpd package on server.

  7. # modprobe ppp_mppe on server and laptop

  8. # echo "ianw pptpd password *" > /etc/ppp/chap-secrets on server

  9. Modify the IP paramters in /etc/pptpd.conf on server to be sane.

  10. Modify /etc/ppp/pptpd-options on server to send a local DNS server.

  11. Enable IP forwarding in /etc/sysctl.conf on server

  12. Now, back to my laptop, I add a new VPN connection with network-manager. You can put the following in a file and "import" it, and it may work.

    [main]
    Description=wienand
    Connection-Type=pptp
    PPTP-Server=my.home.server
    Use-Peer-DNS=yes
    Encrypt-MPPE=no
    Encrypt-MPPE-128=yes
    Compress-MPPC=no
    Compress-Deflate=no
    Compress-BSD=no
    PPP-Lock=yes
    Auth-Peer=no
    Refuse-EAP=no
    Refuse-CHAP=no
    Refuse-MSCHAP=no
    MTU=1416
    MRU=1416
    LCP-Echo-Failure=10
    LCP-Echo-Interval=10
    PPP-Custom-Options=
    Peer-DNS-Over-Tunnel=yes
    X-NM-Routes=
    Use-Routes=no
    

    The big trick for me was having Auth-Peer turned off Restart network-manager after this.

  13. Attempt to connect to your new VPN via network-manager. If you are very lucky, it will "just work". If you are unlucky, you will spend the next few hours staring at the syslogs on both server and client, after turning up the level of debugging for both.

My only problem now is how do I get a domain suffix to my laptop so I can easily get to my home network resources, which all live at server.wienand.home, without editing /etc/resolv.conf by hand? Any suggestions welcome!

Stressing the TLB with matrices

When playing around with memory management a matrix multiply is often mentioned as a TLB thrasher, and a good way to stress your system. It's interesting to illustrate this process a little.

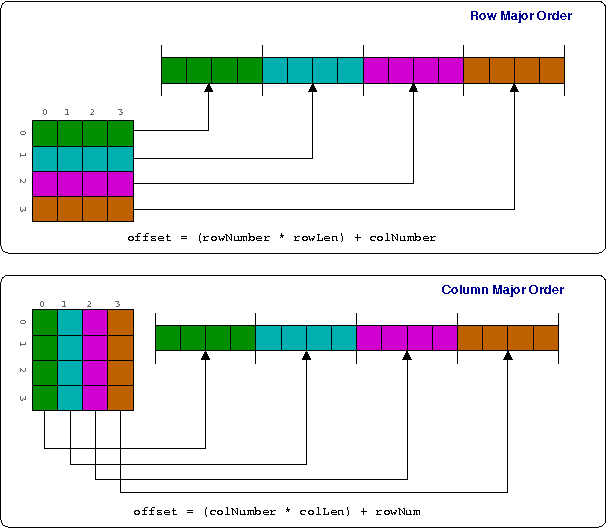
The first thing to remember is that C99 (6.5.2.1 to be precise) dictates that arrays are always stored in row-major order, as shown below.

Example of row-major order

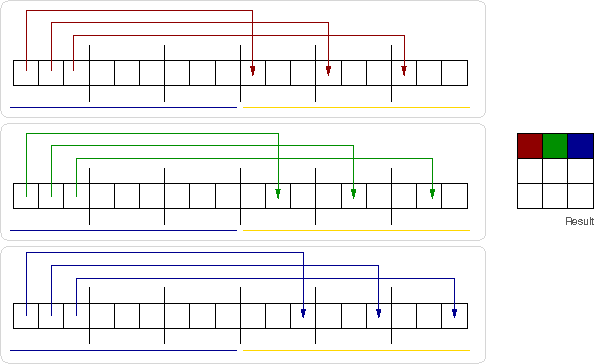
So, remembering back to first year algebra, to multiply two matrices we multiply and sum rows and columns, illustrated linearly as the computer see it below. Black lines are page boundaries, while boxes are matrix elements.

Matrix multiplication

The simplest code to do this is usually along the lines of

int a[LEN][LEN];
int b[LEN][LEN];
int r[LEN][LEN];

int i,j,k

for(i=0; i < LEN; i++)
     for(j = 0; i < LEN; j++)
           for(k = 0; k < LEN; k++)
             r[i][j] += a[i][k] + b[k][j];

We can see how we have a repeated linear walk over the memory holding matrix b, done for each element in a. If we make b sufficiently large (say, a few hundred pages) we can be sure that by the time we get to the end, we have kicked out the earlier TLB entries. Then we start all over again, and start faulting pages back in. Thus a matrix multiply problem comes down to doing repeated page-sized stride walks over a linear region.

Looking at the diagram, it is also clearer what can solve this problem. We can either have more TLB entries, so we don't have to kick out entries which we will use again, or have larger pages -- e.g. less black lines. Or a smarter algorithm ...

Kernel Process Walker

If you're like me, you probably say things like "I wonder how the page tables of every process in the system are populated at the moment" a lot each day. Generally it comes down to "do something for each process running, and print it out".

I think my best effort yet is pview.c (with a Makefile to help build the module). It should also act as a good template for anyone wanting to use either debugfs or the seq_file interface with a queue, something which I have previously found lacking. I have found debugfs and seq_file a good combination; much easier to use than relayfs for non-performance critical medium to large output volumes from the kernel.

Just remember to take the right locks before you go poking around inside processes. Obviously this will perturb the system, but it is often handy for those "what if" questions.

Virtual Linear Page Table

Several people asked me to re-explain virtual linear page tables after my SLUG talk. So here it goes!

3 level page table

First, let's review the standard translation mechanism. We have a large address space, which we divide up into pages. We map pages to frames of physical memory.

The processor has a translation look-aside buffer or TLB which stores a cache of virtual page to physical frame mappings. It is small, but fast. Like any cache, it runs out and needs to be filled. The operating system does this from the page tables, which keep a virtual to physical mapping.

On Linux, we use a multi-level hierarchical page table, illustrated above. First you take some of the top bits, and use that as an index into the page global directory (PGD). You then follow that to a page middle directory entry (PMD), take more bits as an index into that page, and finally follow that to page table entries. Finally, you take another index to find the PTE entry, which points to the physical page the given virtual address is mapped to.

So far, so good. But this walking process is very slow. It requires a lot of memory references and hence cache traffic, and has to be performed at regular intervals.

linear page table

What would be good is if we dispensed with the upper levels, as per the above diagram. So we just keep the PTE entries (which point directly to allocated physical pages) in one long array, and then simply use the VPN as an index into it. This would require much less effort.

The problem is that we can not find that many contiguous (next to each other) physical pages. Even if we could, the amount of physical memory we had to allocate to page tables would be huge! So this scheme won't work.

But we have a large virtual address space. Why not dedicate the top portion of that to be a linear array of PTE entries, and use the TLB to map the virtual pages full of PTE's to actual pages full of PTE's.

virtual linear page table

So when we ask for a virtual page, and it is not mapped by the TLB, we can use the virtual page number as an index into our virtually linear page table (note above we mention that we hash the virtual page number, it equates to the same thing as just using it as an index). We can now go directly to the PTE entry, and as long as the virtual page that PTE entry exists in has a mapping to the underlying physical page full of PTE entries, there is no need to walk the tree - the "virtual" PTE is now a pointer to the real thing! From there, it is a simple matter to read the PTE entry and find the physical frame for the virtual page we are looking for.

Of course, as with any engineering effort, there are trade-offs. Firstly, we have to sacrifice some of our virtual address space to the virtual linear table. We have lots of address space, so this is not too severe. The other trade-off is that you now have an extra TLB entry; as we mentioned the TLB is small, so taking up more entries can have a penalising effect. However, if you are walking linearly through pages, as a program usually does, you will not need to do a full page table walk for a whole page full of PTE entries and it only cost you one TLB entry; a significant win.

Itanium attempts to find the hashed PTE address in hardware, and calls is the virtually hashed page table walker or VHPT walker. If it can not resolve the situation, it returns control to the operating system, which will then have to do a full walk of the page tables. There's a few more details, but that's the broad strokes.

I hope that clears things up for a few people ...

... however if it does not, please feel free to modify the figures to make them clearer!