By now everybody has now heard about Go, Google's expressive, concurrent, garbage collecting language. One big, glaring thing stuck out at me when I was reading the documentation:
Do not communicate by sharing memory; instead, share memory by communicating.
One of the examples given is a semaphore using a channel, which I'll copy here for posterity.
var sem = make(chan int, MaxOutstanding)

func handle(r *Request) {
    sem <- 1;    // Wait for active queue to drain.
    process(r);  // May take a long time.
    <-sem;       // Done; enable next request to run.
}

func Serve(queue chan *Request) {
    for {
        req := <-queue;
        go handle(req);  // Don't wait for handle to finish.
    }
}
Here is a little illustration of that in operation.

Serve creates goroutines via the go keyword; each of which tries to get a slot in the channel. In the example there are only 3 slots, so it acts like a semaphore of count 3. When done, each thread returns its slot to the channel, which allows anyone blocked to be woken and continued.
This instantly reminded me of the very first thing you need to do if you ever want to pass Advanced Operating Systems -- write a semaphore server to provide synchronisation within your OS.
In L4, threads communicate with each other via inter-process communication (IPC). IPC messages have a fixed format - you specify a target thread, bundle some data into the available slots in the IPC format and fire it off. By default you block waiting for a reply -- this all happens within a single call for efficiency. On the other side, you can write servers who are listening for remote IPC connections, where everything happens in reverse.
Here's another illustration the of the trivial semaphore server concept Shehjar and I implemented.
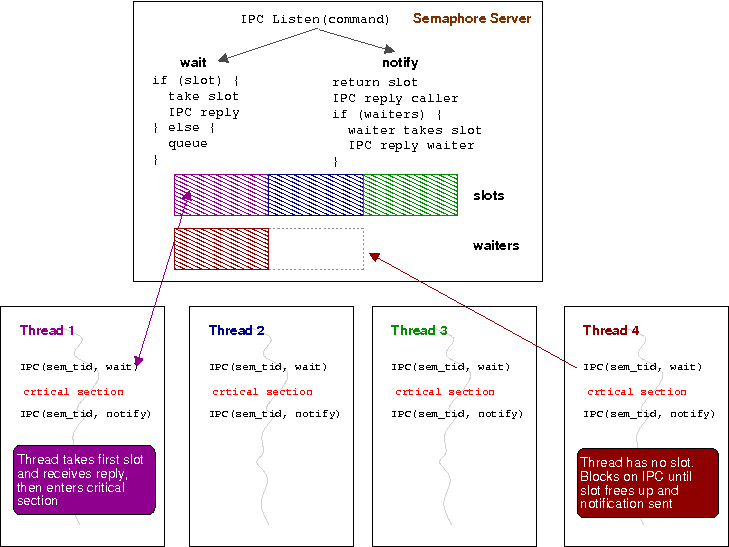
Look familiar? Instead of a blocking push of a number into a slot into a channel, you make a blocking IPC call to a remote server.
My point here is that both take the approach of sharing memory via communication. When using IPC, you bundle up all your information into the available slots in the IPC message and send it. When using a channel, you bundle your information into an entry in the channel and call your goroutine. Receiving the IPC is the same as draining a channel - both result in you getting the information that was bundled into it by the caller.
| IPC | Go |
|---|---|
| Start thread | Start goroutine |
| New thread blocks listening for IPC message | Goroutine blocks draining empty channel |
| Bundle information into IPC message | Bundle data into type of your channel |
| Send IPC to new thread | Push data into channel |
| Remote thread unbundles IPC | goroutine drains channel and gets data |
Whenever you mention the word "microkernel", people go off the deep-end and one thing they seem to forget about is the inherent advantages of sharing state only via communication. As soon as you do that, you've broken open an amazing new tool for concurrency, which is now implicitly implied. By communicating via messages/channels rather than shared global state, it doesn't matter where you run! One of those threads in the example could be running on another computer in your cloud, marshalling up it's IPC messages/channel entries and sending them over TCP/IP -- nobody would care!
At any rate, do not communicate by sharing memory; instead, share memory by communicating is certainly an idea whose time has come.